Affiliate disclosure: Some links on this site or even in this page/post may be affiliate links. If you buy through them, I may earn a small commission, which helps manage this website — at no extra cost to you. I only recommend things I genuinely believe in.
Heads up: I'm not a doctor, just someone living with diabetes passionate about sugar free living. Recipes here are personal and community sourced, not medical advice. Always check with your healthcare provider before changing your diet.
I manage diabetes, so I cannot reach for a regular boxed cake mix loaded with sugar. But I also did not want to say no to cake.
That is when I figured out how to make this viral polka dot cake recipe work for me. The first time I saw this technique on TikTok or even on Pinterest, I honestly thought it was a bakery trick. It is not. It is a home kitchen technique that anyone can pull off with a little planning, and the result is genuinely stunning when you cut into it.
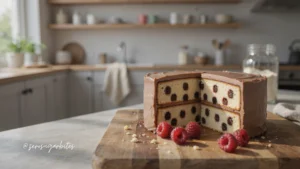
Each slice reveals perfect chocolate dots suspended inside a vanilla almond flour base. No added sugar but it will taste sweet. Sweetened only with stevia. It looks like something from a shop window but costs almost nothing and takes less than an hour start to finish.
If you are a busy parent or managing blood sugar like I am, this one is worth trying.
Why it’s a win
- Everyone making this colorful but this chocolate dot technique looks complex but requires no special baking skill
- Zero added sugar, naturally sweetened with stevia, safe for diabetics
- Made from pantry staples in one round or loaf pan
Show us your bites!
If you made this recipe, share a photo using #zerosugarbites. Be sure to tag us so we can see it: @zerosugarbites (Pinterest) or @biteszerosugar (Instagram)!
This Is the Sugar free Viral Polka Dot Cake Recipe Everyone Is Saving Right Now

You have probably seen this viral dot cake recipe all over Pinterest or even TikTok lately. People are cutting into it on video and the reaction is always the same: surprise, then excitement. The dots appear like magic inside every slice.
The original version uses boxed cake mix, which is full of sugar and processed additives. My version rebuilds it from scratch using almond flour, eggs, cocoa, and stevia. The technique stays the same. The result looks identical. But this one you can actually eat without a blood sugar spike the next morning.
Here is exactly how I make it.
Ingredients
- 2 cup almond flour
- 3 large eggs (use egg whites only for a lighter color)
- 1/3 cup melted coconut oil or unsalted butter
- 1/3 cup unsweetened almond milk
- 1 and 1/2 teaspoons baking powder
- 1 teaspoon vanilla extract
- 6 drops liquid stevia (adjust to taste)
- 1/2 cup of the vanilla batter (scooped out before adding vanilla)
- 2 tablespoons unsweetened cocoa powder
- 1 tablespoon almond milk (to loosen)
- 2 drops liquid stevia
- 1/2 cup softened cream cheese
- 2 tablespoons unsweetened cocoa powder
- 4 drops liquid stevia
- 2 to 3 tablespoons almond milk (to reach spreadable consistency)
For the vanilla batter:
For the chocolate batter:
For assembly and frosting:


Execution
Preheat & Prep Pans: Preheat your oven to 350°F (175°C). Thoroughly grease a 6-inch round cake pan. If you have two pans, grease both to bake layers simultaneously.
Mix Wet Ingredients: In a large bowl, whisk together eggs, melted coconut oil, almond milk, vanilla extract, and stevia until smooth.
Add Dry Ingredients: Incorporate the almond flour and baking powder. Mix until you achieve a thick, smooth batter.
Create Chocolate Dot Batter: Scoop out half a cup of the vanilla batter into a separate small bowl. Stir in cocoa powder, the extra tablespoon of almond milk, and 2 drops of stevia. This mixture should be slightly thicker than your vanilla base.
Bake Chocolate Dots:
Using a Mold: Spoon the chocolate batter into a silicone cake pop mold, filling each cavity. Press the top piece firmly and bake at 350°F (175°C) for 14-16 minutes, until almost cooked through.
Without a Mold: Use a small cookie scoop to portion the chocolate batter into small rounds on a lined baking sheet and bake for the same duration.
Cool Chocolate Dots: Let the baked chocolate balls cool for 5 minutes, then carefully remove them from the mold or baking sheet.
Assemble Cake Layer: Pour a thin layer of vanilla batter into your greased round pan. Arrange 6-7 chocolate balls evenly across the batter in a single layer. Pour additional vanilla batter over the top, just enough to cover the chocolate balls.
Bake Cake Layer: Bake for 30-35 minutes at 350°F (175°C). To check for doneness, insert a toothpick in multiple spots (avoiding the chocolate balls, as they can give a false clean reading).
Cool Completely: Let the cake cool completely on a wire rack before attempting to frost it. This is crucial; warm cake will cause frosting to slide off.
Repeat for Second Layer (Optional): If making a two-layer cake, repeat steps 7-9. Once cooled, stack the layers with a thin spread of frosting in between.
Make Frosting: Beat cream cheese, cocoa powder, stevia drops, and almond milk together until the mixture is smooth and easily spreadable.
Frost & Serve: Frost the top and sides of your cake. Slice and enjoy the surprise polka dots inside!


Additional tips
- Do not rush the cooling.
- I know it is tempting to frost early, but if the cake is even slightly warm, your frosting will slide and you will lose all the clean lines.
- I usually bake the night before and frost in the morning.
- The texture is better the next day too.
Storage and Serving
Store the frosted cake covered in the fridge for up to 4 days. Unfrosted cake layers can be wrapped individually in foil and frozen for up to 3 weeks. Thaw at room temperature for about an hour before frosting.
For serving, I like a few fresh raspberries or strawberries on the side. The tartness cuts through the richness of the cocoa frosting nicely. This also works well as a birthday cake or a special weekend bake when you want something that feels like a real celebration without any sugar guilt.
Nutrition Table (Per Serving)
| Calories | Carbs | Net Carbs | Protein | Fat | Sugar |
|---|---|---|---|---|---|
| 210 | 6g | 4g | 8g | 17g | 0g |
Note: Nutrition is estimated based on standard ingredients. Values may vary slightly depending on your ingredients.
Additional Resources
For more on managing sugar intake, see National Library of Medicine article.
Frequently Asked Questions
Can I make this polka dot cake recipe without almond flour?
You can try a 1:1 gluten free baking flour, but the texture and bake time may change slightly.
Why did my polka dots not show clearly when sliced?
This usually happens if the batters are too similar in thickness. Make sure your chocolate batter is slightly thinner than the vanilla.
Can I use a sugar substitute other than stevia?
I only use stevia in my recipes since it works well for blood sugar management, but other sugar alternatives may work with adjusted quantities.
Is this polka dot cake recipe suitable for diabetics?
Yes, it has zero added sugar and a low net carb count per serving, making it a good option for most diabetic meal plans. Always check with your doctor for personal advice.
Can I double this recipe for more servings?
Yes, just use a larger pan and increase the baking time slightly, checking with a toothpick for doneness.
This viral polka dot cake recipe has become one of the things I am genuinely proud of making in my own kitchen. It looks like it took professional skill but the real secret is just a little patience with the baking order.
If you try it, I would love to know how your viral polka dots turned out. Save this recipe for your next baking day. Drop a comment below if you have any questions.
Show us your bites!
If you made this recipe, share a photo using #zerosugarbites. Be sure to tag us so we can see it: @zerosugarbites (Pinterest) or @biteszerosugar (Instagram)!